This post appeared when I was setting up my this blog. It was created using blogdown and hugo-xmin, and it had a simple look I still quite like. The advice should still hold true, but keep in mind that the look of the blog will not be the same as the current website, which is based on quarto’s default website template.
This is my second blog post about what I learned from customising the hugo-xmin theme. This time, I will speak about how I set up my blog for multilingual mode.
Concretely, I had to do three things:
- Make a choice regarding how to manage multilingual content in in the
content/directory. - Tweak my website’s configurations in the
config.tomlfile. - Alter the header template in
layouts/partials/header.htmlto create a language-switcher menu.
These were the minimal set of changes that got me a result I am happy with. For more details on the possible configurations, you can have a look at the Hugo documentation. If on the other hand this seems like too much work, know that there are many other themes that have built-in support for multilingual mode. You can find a complete list at https://themes.gohugo.io/tags/multilingual/.
Lastly, you should know that there are other ways to add content in different languages to your website without relying on Hugo’s multilingual mode. Yihui does something to that effect in his website, where he hosts independent English and Chinese blogs. His configurations are fairly complicated, so I didn’t try to replicate them, but they do result in what I think is a nicer content/ directory structure.
Implementing multilingual mode
The content/ directory
The default way to manage multilingual content in Hugo via a filename approach. This means that we have to add a two-letter prefix (e.g. fr) to the file extension of all posts that are not in the website’s primary language.
├── _index.Rmarkdown
├── _index.markdown
├── _index.fr.Rmarkdown
├── _index.fr.markdown
├── about.md
├── about.fr.md
├── note
│   └── une-note-rapide.fr.md
└── post
    ├── lorem-ipsum.md
    ├── r-rmarkdown.Rmd
    ├── r-rmarkdown.html
    ├── hello-markdown.fr.md
    └── hello-markdown.md
Hugo will use the two-letter file extension prefix to create the URLs of all content in a secondary language.
| File | Website URL |
|---|---|
_index.Rmarkdown |
example.com/ |
_index.fr.Rmarkdown |
example.com/fr/ |
about.md |
example.com/about |
about.fr.md |
example.com/fr/about |
une-note-rapide.fr.md |
example.com/fr/une-note-rapide/ |
hello-markdown.md |
example.com/hello-markdown/ |
hello-markdown.fr.md |
example.com/fr/hello-markdown/ |
An alternative way to manage multilingual content is by directory, in which we sort content of secondary languages into their own language-specific directories.1 2
├── _index.Rmarkdown
├── _index.markdown
├── about.md
├── post
|   ├── lorem-ipsum.md
|   ├── r-rmarkdown.Rmd
|   ├── r-rmarkdown.html
|   └── hello-markdown.md
└── fr
    ├── _index.Rmarkdown
    ├── _index.markdown
    ├── about.md
    ├── note
    │   └── une-note-rapide.md
    └── post
        └── hello-markdown.md
I decided to go with the filename approach because I find nested directories difficult to navigate, but ultimately it’s a matter of personal choice. For a more comprehensive overview, I recommend this blog post about managing content translation.
The config.toml
Here is an example with the main changes that I made to the original hugo-xmin config.toml file:
baseurl = "/"
defaultContentLanguage = "en"
title = "A minimal Hugo website"
theme = "hugo-xmin"
googleAnalytics = ""
disqusShortname = ""
ignoreFiles = ["\\.Rmd$", "\\.Rmarkdown$", "_files$", "_cache$"]
footnotereturnlinkcontents = "↩"

[permalinks]
    post = "/post/:year/:month/:day/:slug/"
    note = "/note/:year/:month/:day/:slug/"

# Parameters for each language
[languages]
  [languages.en]
    languageCode = "en-GB"
  [languages.es]
    languageCode = "es-CO"
  [languages.fr]
    languageCode = "fr-FR"

# One menu per language
[[languages.en.menu.main]]
    url    = "/"
    name   = "Blog"
    weight = 1
[[languages.fr.menu.main]]
    url    = "/"
    name   = "Blogue"
    weight = 1
[[languages.en.menu.main]]
    name = "About"
    url = "/about/"
    weight = 2
[[languages.fr.menu.main]]
    name = "À propos"
    url = "/about/"
    weight = 2
# ... and so on
Setting the defaultContentLanguage
First, I defined the default language for the website with the defaultContentLanguage parameter.
baseurl = "/"
defaultContentLanguage = "en"
title = "A minimal Hugo website"
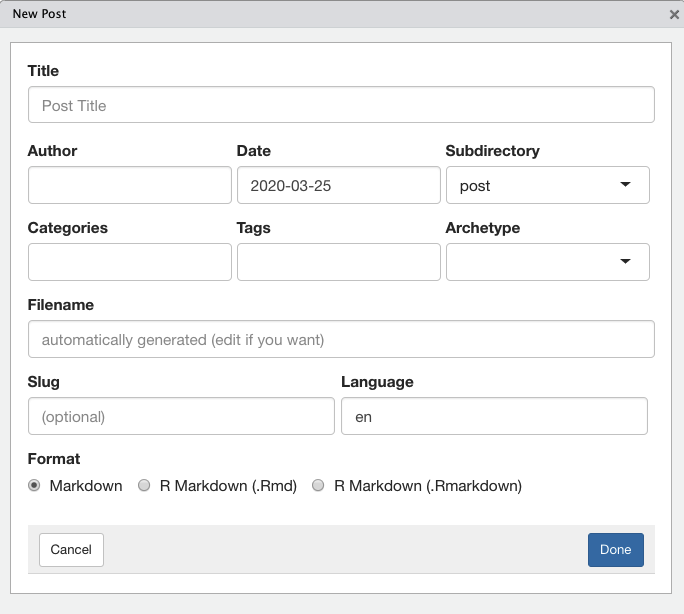
theme = "hugo-xmin"This wasn’t strictly necessary in this case because defaultContentLanguage will be set to en if the parameter is not provided. There is however an advantage to explicitly setting this parameter: when provided, the “New Post” addin in RStudio will have a “Language” field that will allow you to easily specify change the language extension of your post.
Language configurations
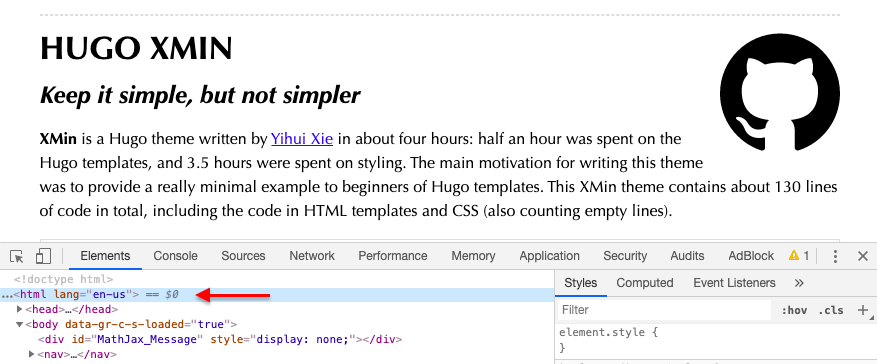
The second change I made to my config.toml was to set the languageCode parameter for each language.
# Parameters for each language
[languages]
  [languages.en]
    languageCode = "en-GB"
  [languages.es]
    languageCode = "es-CO"
  [languages.fr]
    languageCode = "fr-FR"
This parameter generates the HTML lang attribute of each page, which is used by search engines and RSS feeds to filter content. Below is an example from https://xmin.yihui.org/.
If you chose to manage your content with the directory approach I mentioned earlier, then this is the place where you would have to specify the content directory of the secondary languages.
[languages]
  [languages.en]
    languageCode = "en-GB"
  [languages.es]
    languageCode = "es-CO"
    contentDir = "content/es"
  [languages.fr]
    languageCode = "fr-FR"
contentDir = "content/fr"The header.html
The final step in my configurations was to add a language-switcher. The language-switcher will be displayed on all pages that have translated content. Every time a visitor to the website clicks on one of the languages, the language of the menus and the contents of the page will be updated. The animation below shows how the language switcher looks like from the “Home” page of this site.

I chose to put mine at the end of the regular menus, following the exact steps that lizyn suggested in issue #13 of the hugo-xmin repo.
First, I created a partial template, layouts/partials/translations.html. I also assigned the lang-switch class to this new element to make it easier to change its look via CSS.
{{ if .IsTranslated }}
    {{ i18n "translations" }}
    {{ range .Translations }}
    <li><a class="lang-switch" href="{{ .Permalink }}">{{ .Lang }}</a></li>
    {{ end }}
{{ end }}
I then inserted the translation template to layouts/partials/header.html, right after the menus. Moreover, I made sure that the menu hyperlinks were created from relLangURL instead of relURL, which creates a relative URL with the correct language prefix.
<!DOCTYPE html>
<html lang="{{ .Site.LanguageCode }}">
  <head>
    <meta charset="utf-8">
    <meta name="viewport" content="width=device-width, initial-scale=1">
    <title>{{ .Title }} | {{ .Site.Title }}</title>
    <link rel="stylesheet" href="{{ "/css/style.css" | relURL }}" />
    <link rel="stylesheet" href="{{ "/css/fonts.css" | relURL }}" />
    {{ partial "head_custom.html" . }}
  </head>

  <body>
    <nav>
    <ul class="menu">
      {{ range .Site.Menus.main }}
      <li><a href="{{ .URL | relLangURL }}">{{ .Name }}</a></li>
      {{ end }}
      {{ partial "translations.html" . }}
    </ul>
    <hr/>
    </nav>
As I mentioned before, it is possible to tweak the look of the language-switcher by defining a style for the lang-switch class in static/css/style.css. For example, I put the language options in bold font to differentiate them from the regular menu items.
.lang-switch { font-weight: bold; }Conclusion
I hope that this guide is clear and that it may help others enable multilingual content in their blogdown websites if their theme doesn’t currently support it. Please let me know if you find it useful in the comments below!
Footnotes
In this case, we also have to add the
contentDirparameter to thelanguagesconfiguration inconfig.toml, as I show in the next section.↩︎You can also put the files of the primary language in their own sub-directory. In this case, you will need to set
defaultContentLanguageInSubdir: trueinconfig.toml.↩︎